 |
 Blocks Blocks
|
What are blocks, you ask? Well, blocks are the little boxes that appear on the left and right side of your web pages. You can see a block in the left side of your website called Navigation. This is the only block that you cannot remove from your page. it can be edited by simply adding or taking away pages from your site. This is where your navigation menu links can display. But the Blocks module allows you to create as many blocks as you wish for advertising, special announcements, small images, ANYTHING! And now you will learn how to use them.
 NOTE: Outside Java applets and codes placed in this are are not supported by our staff. This is a simple HTML editor, and may not be able to properly save other programming language codes. Please use care. NOTE: Outside Java applets and codes placed in this are are not supported by our staff. This is a simple HTML editor, and may not be able to properly save other programming language codes. Please use care.
|
Accessing the Blocks Management Section
|
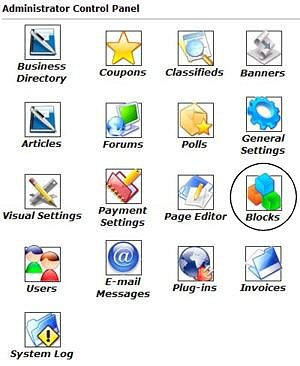
The first step will be to login to your Control Panel (this is the same Url as the User Login link on your homepage) using your administration username and password. You will want to click on the icon that is circled in this image (Blocks) in order to access and edit any existing blocks within your site or to create and apply new ones. After clicking on this icon, a Block List will display of all existing blocks within your site.
|
Editing Existing Blocks/Creating New Blocks
|
The Title column shows you the name of the block, which is what will be displayed in the header section (top) of the block. The final column contains the following icons:
 Edits a block. Edits a block.
 Deletes a block (this action cannot be undone). Deletes a block (this action cannot be undone).
Toward the bottom of the Block List, you can see the text link giving you the option to add a New Block. Please click this link now.
Blocks are relatively easy to set up. Once you are comfortable with the editor, then you will have no trouble customizing your text and uploading images into a block. You can learn the basics of customizations to blocks by reading the Page Editor chapter.
|
TIP: As a general rule, in order to make your pages fit comfortably in any screen size resolution, your content placed in your center panel should not exceed 450 pixels in width and your blocks should not exceed 140 pixels in width (collectively with padding between blocks and center panel 730 pixels). Anything larger will create an inconvenient left to right scroll bar for users whose browser settings are 800 x 600 resolution. To view an images pixel width, right mouse click on the image and select 'Properties'.
|
*Java Script and html code found on other sites: Any html code copy and pasted from outside sources is considered outside content and will not be supported by our staff. There are simply too many codes and languages out there written by people who may or may not have known what they were doing. Some of these codes may be poorly written, or may be coded in such a way as to not be supported by our editor. By placing 'code' from other sources in the editor may cause the following:
-
Improper displaying of content when viewed in the browser
-
Locking the 'Update Button' after saving so no further changes can be made
-
Distorting the page and payout of the page the content was added to, causing blocks to display in 'wrong' areas, causing blocks not to display at all.
All of these effects are caused by the code entered into the editor, not of any fault with our software. If this issue occurs, the content will be deleted by our staff. It is simply too time consuming for our staff to try to find every instance of poor coding found from other sources on the Internet.
|
Please do not paste any text/content directly into the editor from Microsoft Word. Word formatting is not compatible with our editor and will lead to editing issues that are not supported by our staff. Though the editor does offer a 'Paste from Word' tool, this is not always perfect and should be used only when necessary and with the understanding compatibility issues can still occur. |
|
For a complete list of the WYSIWYG Icons and what they do,
please click here.
|
When you are finished creating your block, click the Create Block link at the bottom f the page. You should get a Block created successfully message. Next, click Return to Blocks. You will now see your new block listed in the Block List.
|
Adding/Removing Blocks to a Page
|
Adding Blocks to Your Pages
Now that you have created your block(s), you are probably wondering how you make it appear to visitors on your pages. You will notice that your websites themes have three columns on each page. Two smaller columns on the left and right side, and a larger column in the center. The left and right columns are for your blocks.
To add a block to the left or right side of any page you will need to return to the Control Panel and select the Page Editor. Remember the  (Manage Blocks) icon in the Page List? This is where it comes into play! Decide on which page you want the newly created block to appear. Once you have the perfect place in mind for your block, click the (Manage Blocks) icon associated with that page. In this example, we are selecting the Home page. (Manage Blocks) icon in the Page List? This is where it comes into play! Decide on which page you want the newly created block to appear. Once you have the perfect place in mind for your block, click the (Manage Blocks) icon associated with that page. In this example, we are selecting the Home page.
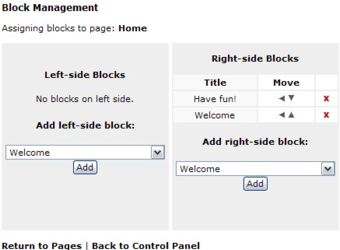
You have now entered the Block Management area. It should look similar to the below image:
|
|
There is a Help Section on the right of this page to guide you through the block process if you need reminders.
The Left-side Blocks column shows all blocks that appear on the left side of the page. Currently none, from our example. Similarly, the Right-side blocks column shows all blocks that appear on the right side of the page.
|
Adding Blocks
To add a block to the page, select the block from the dropdown lists, then click 'Add'. The new block will appear at the bottom of the list.
Moving Blocks
Use the arrows next to each block to move the block around the page. For example, clicking 'down' will move the block down; clicking 'right' will move the block to the right side of the page; etc.
Removing Blocks
To remove a block from the page, click the red 'X' icon next to the corresponding block. Please Note: This will not delete the block; it will simply remove the block from this page. You will still be able to put the block back on this page (or on another page) at any time.
A block can be added to many pages at one time.
|
|
|