 |
 Newsletter Newsletter
This is a very strong plugin that will greatly enhance the marketing side of your new website. It will allow Admins to email users with specials and announcements in a clean HTML format. Users must subscribe to Newsletter to be included in mailing list.
You will first need to Install the Plug-in, if you have not already done so.
As spamming is a serious offense and our company has a zero tolerance stance on spamming, we require that you agree to our terms for Newsletter plugin use.
Our company has a zero tolerance policy on sending SPAM. Spam is defined as: the sending of the same, or substantially similar, unsolicited electronic mail messages, whether commercial or not, to more than one recipient. A message is considered unsolicited if it is sent to a recipient who has not requested or invited the message.
Violations of our Spam policy will result in one the following actions depending on the seriousness of the breech:
- A warning notification via email, Support Center ticket or telephone, with 72 hours notice for resolution.
- Block of further access to the newsletter plugin
- Immediate termination of your website from our service with no re-activation.
Next, it is important to know that just installing a plug-in does not make it accessible to your website visitors. Once it has been installed, you will need to go to the Page Editor and 'set it up'. You will need to make it 'active', tell it where you wish the navigation link to display, and assign it the proper 'plug-in'. How to do this is explained below:
Setting Up Your Plugin
 |
 |
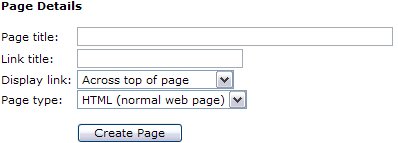
| After clicking your Page Editor icon in your Admin Control Panel, you will need to click the text link for a New Page. In this example, we are going to set up the Newsletter plug-in. In the Page title we have inserted the page name. This title is also what will be displayed in your navigation menus. In the Link title we have entered Newsletter. Remember, this is the name file that will be created and must be one word or words connected by an underscore (ex: Real_Estate). Next decide where you wish the link to display. And finally, since this is a Plug-in, change the Page type from HTML, to Plug-in. Click the Create Page button to continue. |
|
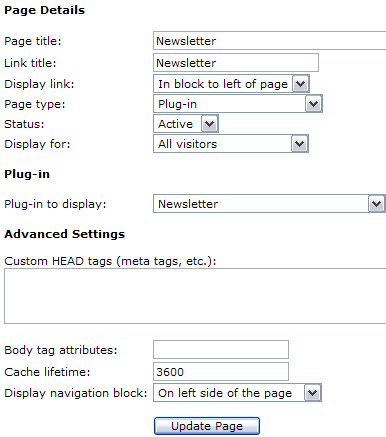 |
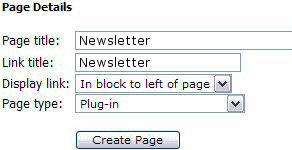
To complete the activation of your new Plug-in, you will need to change the Status from Hidden to Active.
Next you will need to change the Plug-in to display from the default 'Business Directory' to the 'Newsletter', or whichever Plug-in you are actually installing.
See example of changes on left.
Finally select Update Page. Your page is now complete and ready to begin collecting signups from your users who wish to subscribe to your newsletter!
After you have completed these steps, you can return to the Control Panel. You will now be able to see and select the Newsletter icon in your Administrators menu!
Newsletter
|
|
Once you have clicked the icon, you will see a layout similar to the one below.
Please note: When your plugin is first installed, there will be no Newsletter contacts listed. We have inserted sample subscribers in our list here for demonstration purposes only. |
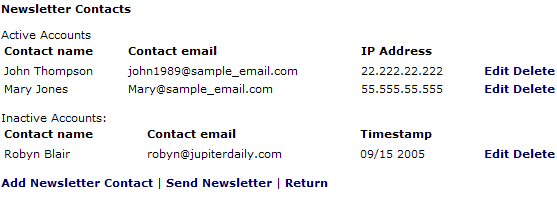
This area contains a list of all users who are actively subscribed to your newsletter. It displays to you their name, their email address, their IP address for security purposes and the options to edit or delete the contact.
Below the active contacts is a list of any inactive contacts. Users listed in this area have completed the first step of the signup process but have yet to confirm their request by clicking on the activation Url within the confirmation email sent to them. We will go further into the actual sign up process a bit later.
The last row of options in this area allows you to add a newsletter contact manually, and to send a newsletter to all current active contacts. It is strongly suggested that you do not manually add any persons to the contact to the list unless one of the following occurs:
-
You know the contact personally and are 100% certain adding them to your list will not subject you to be reported for spam
-
The contact was unable to activate their own subscription successfully by clicking the activation link within the confirmation email. If this happens, it is suggested that you verify the email account yourself to which the newsletter is subscribed as actually belonging to the person making the request. You can do this by requesting they send an email to you from the requested subscription email account.
Send Newsletter
Now the real fun begins! Creating and sending your first newsletter. When you are ready to begin, click the text link "Send Newsletter" below your list of Newsletter subscribers.
The next page that opens will contain three WYSIWYG Editors for you to use to create your newsletter. Your template for your newsletter lays out over three columns, like this:
Sample Newsletter Title
| Left Column
Lorem ipsum dolor sit amet, consectetuer adipiscing elit. Praesent vel orci. Duis posuere. Nulla facilisi. Donec pellentesque lacinia lorem.
Sed id lorem. Aenean sed lacus. Quisque at tellus. Mauris vestibulum vulputate lacus. |
Center Column
Lorem ipsum dolor sit amet, consectetuer adipiscing elit. Praesent vel orci. Duis posuere. Nulla facilisi. Donec pellentesque lacinia lorem. Sed id lorem. Aenean sed lacus. Quisque at tellus. Mauris vestibulum vulputate lacus.
Donec rutrum, odio sed vulputate molestie, risus enim mollis augue, in feugiat libero diam sit amet justo. Cum sociis natoque penatibus et magnis dis parturient montes, nascetur ridiculus mus. Suspendisse hendrerit ipsum et erat. Morbi aliquam nunc a tortor. Pellentesque quis mi in nisl tincidunt tincidunt. |
Right Column
Cum sociis natoque penatibus et magnis dis parturient montes, nascetur ridiculus mus.
Suspendisse hendrerit ipsum et erat. Morbi aliquam nunc a tortor. Pellentesque quis mi in nisl tincidunt tincidunt. |
The top WYSIWYG Editor creates what would be the left column of the newsletter, the center Editor creates the center column and the bottom Editor the right column. Add your content to the appropriate areas using the WYSIWYG Editor tools provided. You can apply formatting to text, insert images, and create hyperlinks within your newsletter all with the tools provided.
Note: Flash and media files will not be supported in the newsletter.
|
 For a complete list of the WYSIWYG Icons and what they do, For a complete list of the WYSIWYG Icons and what they do,
please click here. |
Once you have completed creating your three newsletter columns, clicking the submit button at the bottom of the page will allow you to preview your newsletter before sending it. If you need to make changes to the content before sending, you can click the 'Return' button. If you are ready to send the newsletter, click the 'Confirm' button and the newsletter will be immediately sent.
The sending of the newsletter is handled internally through the software. It will send a copy to you, the administrator of the site and all other subscribers will be listed as BCC recipients to protect their identities from others. The only address they will see in the 'Sent To:' field will be your contact email address from your General Settings area in the Admin Control Panel. Saving the newsletter for later use:
Anytime you click the Preview option at the bottom of the page while working on your newsletter, it will
show you a preview of the newsletter without sending it and will
automatically save it in its current form to the archive for later use. Each preview will create a new save point with date and time.
Subscribing to your newsletter
Users can subscribe to your newsletter through one of two different means. Below is a brief explanation of the sign up process.
Probably the best way your users will learn about your Newsletter is during the registration process to become a general user of other area within your site (Forums, Classifieds, Business Directory, etc).
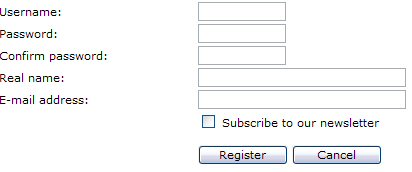
Once your Newsletter plugin has been installed and properly set up, a small check box inviting your users to subscribe will automatically display within the form on your site's registration page. If a user agrees to receive your newsletter, they need only click in the checkbox to enable this option. Once the activation URL within their confirmation email has been clicked, their account will become active and they will be automatically added to your Newsletter Contact list.
IMPORTANT: Your plugin must be properly set up on a page that is marked active or this option will not appear on your registration form! This is a safeguard in the plugin that is built in to ensure our TOS (terms of service) are adhered to.
The option on your registration page only shows up if you've setup the newsletter plugin and applied to plugin to a page on your site which is active. Though you may have set it up on a page, the page is most likely marked 'hidden' which would prevent anyone from unsubscribing, so the "subscribe to our newsletter" option was hidden on the registration form as a result.
Changing your newsletter page status from hidden to active will allow the newsletter subscribe option to properly display on your registration form. |
The page we created in the beginning of this tutorial is another way users can learn about and subscribe to your newsletter.
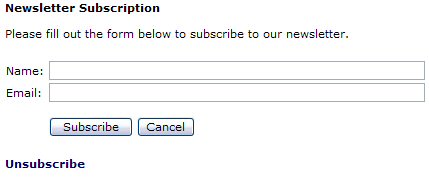
This is also the page they will use if they wish to unsubscribe themselves. Each newsletter that is sent contains an unsubscribe link at the bottom to allow users to conveniently leave your mailing list. They will be brought to this page where they need only click the Unsubscribe link and insert the email address to which the newsletter is received.
Note: If a user emails you directly requesting they be removed from your newsletter, please remove them without delay! You can either delete them from within the active contacts list in the Newsletter management area, or you can click the unsubscribe link within the newsletter page and enter their email address manually. Doing it this way will send them a confirmation email to verify they do indeed wish to leave your newsletter.
|
|