|
 Real Estate Real Estate
(Not available on all sites - contact your sales department for info)
This is a very strong add-on that will greatly enhance your new website. Listings are automatically deleted upon expiration to ease your administration tasks. Please keep in mind, though strong in features, this module is meant to be utilized by the general public visiting your site. It is not intended to be a replacement for the MSL for agents. Agents are welcome to list their ads if they wish.
Suggestions for improvements to this plugin can be made here:
http://www.bullseyesupport.com/pages/Suggestion
Suggestions made will be considered for future addition, but are not guaranteed.
What you will learn in this section:
- How to install and apply this plugin to a new page
- How to edit your General Settings
- How to customize the area above and below the categories on the page
- How to edit/approve/delete existing listings created by your users
- How to add new features to the list form which your users will choose
- How to use the Real Estate Listings Block
- How to add/edit/delete categories to your plugin
- How to add a new listing
You will first need to Install the Plug-in, if you have not already done so.
Next, it is important to know that just installing a plug-in does not make it accessible to your website's visitors. Once it has been installed, you will need to go to the Page Editor and 'set it up'. You will need to make it 'active', tell it where you wish the navigation link to display, and assign it the proper 'plug-in'. How to do this is explained below: Setting Up Your Plugin 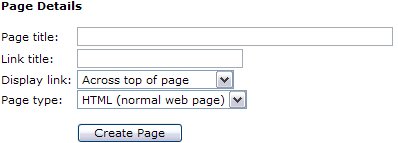 | 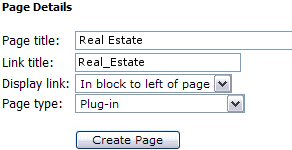
| | After clicking your Page Editor icon in your Admin Control Panel, you will need to click the text link for a New Page. In this example, we are going to set up the Real Estate plug-in. In the Page title we have inserted the page name. This title is also what will be displayed in your navigation menus. In the Link title I have entered Real Estate. Remember, this is the name file that will be created and must be one word. Next decide where you wish the link to display. And finally, since this is a Plug-in, change the Page type from HTML, to Plug-in. Click the Create Page button to continue. |
| 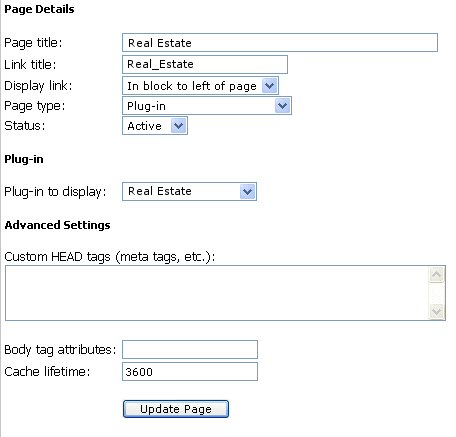 | To complete the activation of your new Plug-in, you will need to change the Status from Hidden to Active. Next you will need to change the Plug-in to display from the default 'Business Directory' to the 'Real Estate', or whichever Plug-in you are actually installing. See left example of changes. Finally select Update Page. After you have completed these steps, you can return to the Control Panel. You will now be able to see and select the Real Estate icon in your Administrators menu!
|
Real Estate Menu 
 Home Home
This link brings you back to the Control Panel Home.
 Settings Settings
This is where you will set up your Real Estate Plugin options, preferences and add any custom text either above of below the categories on the Real Estate Page.
General Settings
Action for pre-paid listings: As you can see from the options above, and their drop down bars, you have the ability to set whether or not a listing will be automatically added to your site, or if you want to review and approve each listing first. Note: If you prefer to screen all listings for appropriateness prior to activation, you should set 'Action for pre-paid listings' to 'Hold for administrator approval'.
Allow users to edit their listings: If you enable the 'Allow users to edit listings' feature, your users will be able to completely change the listing details after you approve it. This may defeat the purpose of holding the listing for approval. But will save you the headache of updating a listing each time they notice a typo or need a small adjustment. Maximum number of photos allowed: This tells the system how many images you will allow each listing to contain. Keep in mind, the more images you allow, the more valuable the ad becomes. However, more images means more bandwidth (data transfer usage). Listings may be listed in up to: Depending upon your category structure, some listings may be pertinent for more than one category. By allowing the suer to place their listing in more than one category at a time allows the ad to receive potentially greater exposure.
Offer "add our search to your site" feature: This is a great little JavaScript tool your users can access to add to their own websites. If they choose to do this, they will receive a script which will allow visitors to their own website to search for listings located within YOUR website. This means more exposure for you!
Apply taxes to listing purchases: If your local or state laws require you to add sales tax to your online purchases for advertising, this is where you can enable tax to be added to users invoices for listings. Allow users to create listings: This function was added to make our software more 'real estate' agent friendly. By disabling this option, only the admin will be able to access the area for creating new listings. This gives the admin exclusive rights to the listings created on the site.
Unlimited listings: Listings can be charge on a per week basis (Weekly real-estate listing), or by purchasing one of the unlimited package options. This will enable their account to add as many listings as they wish for a set amount of time for one set price. Options for unlimited listings are either one month, three months or one full year.
Import MLS: Unlimited Listing options unlock the Import MLS option in the Users Control Panel which will allow the user to upload bulk listings in a CSV format. The MLS CSV exports do not include photos, so they would need to be manually added to each listing separately after listing creation. Click here to view an example CSV export from MLS.
** Import File Criteria: Comma delimited, CSV files must be under 512 KB and should include all of the following information:
ML#,Status,PIX #,Area,List Price,S Price,Address,Subd Dev Name,Sub Type,Year Built,Pool,Gge,Beds,FB,HB,Waterfnt,Pub Remearks,Addenda,Addenda,Addenda,Addenda,Addenda,Addenda
This is the default report exported by MLS with two description fields added (this takes an
extra step. If you do not know how to export this list, please contact your MLS for instruction). If your file does not match our criteria, this option will not work for you.
Google Maps API key:
 Problems getting Google's Interactive Map to locate an address? Problems getting Google's Interactive Map to locate an address?
- If you see an address failing to map in the API, try the address in Google
Maps.
- If it works in Google Maps, then it's a Google problem and we can't do
anything about it.
- If it doesn't work in Google Maps either, then you've probably got a bad
address on your hands and you should check the address and/or make sure it's
formatted in a standard way (i.e., don't use incorrect abbreviations like "Str."
for street, etc.)
- If none of your addresses can map, you probably have another script on the page that is conflicting with the maps script. Remove any other content which use JavaScripts from the Real Estate page. If you are not certain what this might be, please open a help ticket.
Content This section will allow the admin the ability to place a small amount of text either above or directly below the categories table on the Real Estate page. This is optional, if you need additional space to provide instructions, a special announcement or any other important information which you wish to share with your website's users. This can also make excellent advertising space for page sponsors. When selecting the 'Edit Text' button for either above or below the categories, you will be viewing the WYSIWYG Editor tool. 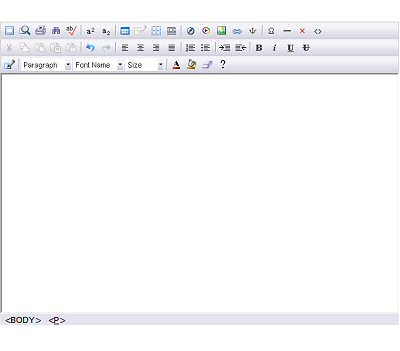
How to use this Editor is explained in the Page Editor chapter of our guide.
 For a complete list of the WYSIWYG Icons and what they do, For a complete list of the WYSIWYG Icons and what they do,
please click here
|
 Listings Listings
Here you can edit any information pertaining to a current listing within the Real Estate plugin, or enable/delete a listing awaiting your review. After selecting the above Listings icon, you will see a list of all current listings. This includes listings that have not yet been paid or approved.

Please note: Only 15 results per page are posted. You can choose from the pages numbered below the list to view more. In this section you can see the first image of the listing if one was uploaded, the listing title, a few listing details, their current status (Awaiting Approval or Active), and finally you are given the ability to Edit  or Delete or Delete  the listing. The display order is Awaiting Approval or Payment first, then Active listings and finally Expired listings. the listing. The display order is Awaiting Approval or Payment first, then Active listings and finally Expired listings.
Clicking the Edit link allows you to access the Listing Details section to edit any current information or approve/deactivate the listing.
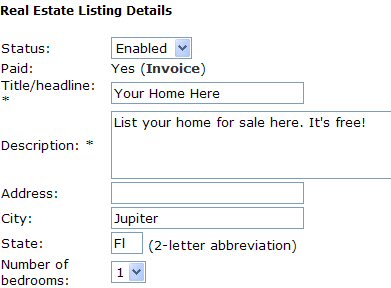 | Changing the status from Disabled to Enabled is done easily from the first option on this page, as you can see in the image to the left. Note: If a listing has not been paid for, you cannot enable it until the invoice is paid.
You can mark an invoice 'paid' by clicking the 'Invoice' link (next to Paid: No) and clicking 'Mark as paid'. In this section you can also change the expiration date of the listing to allow it a longer running.
|
At the bottom of the Real Estate Listing Details is a button to Update your changes.
 Categories Categories
Adding categories to your Real Estate module is a snap! Or should we say 'a click'?
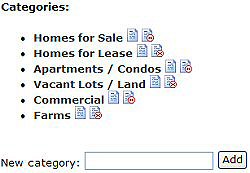 | To the left, you can see a sample list of categories and your options associated with them.  Edits a category (changes it's name). Edits a category (changes it's name).
 Deletes a category. Deletes a category.
To create a new category, simply type in the name of the new category into the field below the existing categories and click the Add button. |
Note: You can create as many categories as you wish. Sub-categories are not supported in this module.
Features
If you wish to add features to either the Home or Community list to help expedite the listing process for the user, you can do that here. 
First you will see a list of all current features categorized by either Home or Community. Edits a feature (changes it's name).
Deletes a feature. Below the lists, you are given the ability to add new features. Simply type in the name of the new feature as you wish it to appear, then set the Type accordingly, by using the drop down bar to select whether it is a Home or a Community feature. Click the Add button to finish. Add as many features as you wish. They will display alphabetically and as check boxes to easily allow the user to add these features to their real estate listing.
 Real Estate Listings Block Real Estate Listings Block
Your Real Estate Module comes with a block that automatically get installed as part of the plugin. This block self updates and displays the first image uploaded to all listings that use a photo. The images rotate out on a timed basis. This functionality cannot be altered in any way. The block code is protected to keep its functionality in an operating order. The wording and block title also cannot be changed. You can access this block and apply it to any pages you want using the Page Editor's Manage Blocks option. You can learn more about applying the block (Titled: real Estate Listings) in the Page Editor Chapter of this Guide.
Note: The block cannot be created until at least one listing with at least one image uploaded exists. The block will be created automatically when the first listing with photo is created. =====================================================================  This completes the "How to Administer Your Real Estate Plugin". Continue This completes the "How to Administer Your Real Estate Plugin". Continue
below to learn how a user (and yourself) can add a listing to the Real Estate
Plugin.
=====================================================================
Adding a Real Estate Listing as a User
Now that you know how to administer your new Real Estate Module, it is time to learn how to add a listing so you can help your users, should they have questions. 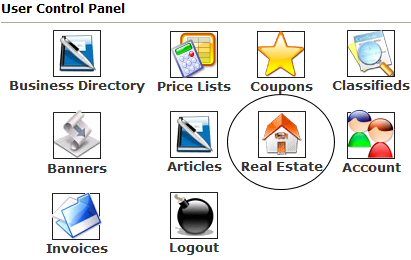
| In order to add a listing to the Real Estate module, you will need to login to your Control Panel using your username and password. Click on the icon that is circled in this image (Real Estate) under the USER Control Panel (not the Administrators). This is where you can view all active listings associated with your username and create new listings. |
After clicking the Real Estate icon, if you have no listings currently advertised, you will see text similar to that below. 
Profile tab: Allows users to quickly apply their contact
information and other listing details to any new real estate listings
they create. This saves them from having to re-type this information
for every listing and to easily update bulk listings if any general information such as a phone number has recently changed. This option would be mostly utilized by Realtors.
Purchase Unlimited tab: This will enable the users account to add as many listings as they wish for
a set amount of time for one set price. Options for unlimited listings
are either one month, three months or one full year depending upon the admins preferences.
Import MLS:
***Important: This option is only available to users who have purchased the Unlimited Listings option.*** Unlimited Listing options unlock the Import MLS option in the Users
Control Panel which will allow the user to upload bulk listings in a
CSV format. The MLS CSV exports do not include photos, so they would
need to be manually added to each listing separately after listing
creation.
Create a listing: Clicking the 'Create a listing' tab will get you started.
Adding the listing is then as simple as completing an online form. Required Fields are marked with an asterisk (*). Please only click the Submit button once when finished creating your listing. Depending on the size of your images you may be uploading, it may take a few minutes to process the listing. If photos are being added, please note: Valid image files include JPEG (.jpg), GIF (.gif), and PNG (.png) images. Other
types of files such as PDF and PPT files are not images, and cannot be accepted. **Images MUST be under 341.8 KB.** or they will be ignored and the image upload will fail.
Upon clicking Submit, you are brought to the Invoice Details letting you know if any fees are owed. If so, you can proceed to make a payment online by following the instructions provided or by mail in in a check or money order if a mail in address is provided (this option is enabled at the site Administrator's discretion). Clicking Return will return you to the User Control Panel.
Managing current listings: If you already have listings associated with your username, clicking the Real Estate icon within the User Control Panel would display much like below: 
As you can see, a thumbnail image of the first photo uploaded to the listing is displayed along with the listing Title, and a few details about the listing. You are also given the ability to Edit  or Delete or Delete  the listing. If the listing is currently expired, an option titled ' the listing. If the listing is currently expired, an option titled '  Renew Listing' will also be available for the users convenience. Renew Listing' will also be available for the users convenience.
When the ad is due to expire, the user will receive email notification with a link to renew the listing any time in the next 30 days. The site Admin will also receive a copy of this email. If they do nothing (choose to not renew their ad) the ad will be permanently deleted. If the user wishes to re-list their ad after the 30 days grace period, they must re-list the ad manually.
|